How to Make Lederhosen? A Complete Step-by-Step Guide
Lederhosen is more than just traditional German clothing—it’s a piece of cultural history. Handmade Lederhosen carries a special charm and durability unmatched by mass-produced versions. Whether you're preparing for Oktoberfest or simply passionate about Bavarian heritage, this step-by-step guide will walk you through the process of making your very own Lederhosen.
1. Understanding What Lederhosen Is
Lederhosen, which literally translates to "leather trousers," is traditional attire that originated in the Alpine regions. Made primarily from tanned leather, usually deer or cowhide, these trousers were designed for hard outdoor work. Today, they’re a style symbol during events like Oktoberfest. Knowing the cultural background helps guide your design choices when crafting a pair yourself.
2. Choosing the Right Leather
Leather choice is crucial for both appearance and durability. Cowhide is strong and affordable, while deerskin is softer and more luxurious. Thickness should be about 1.5 to 2 mm for ease of sewing. Look for vegetable-tanned leather for a traditional finish. Some specialized stores offer pre-cut and dyed hides, making your job easier.
3. Tools and Materials You Will Need
To get started, gather essential materials such as:
Leather sheets
Leather needles and thread
Tailor’s chalk
Scissors or rotary cutter
Pattern paper
Sewing machine (heavy-duty or industrial if possible)
Invest in quality tools to ensure clean cuts and strong seams.
4. Taking Your Measurements
Before drafting your pattern, measure your waist, hips, thighs, and inseam accurately. Traditional Lederhosen fits snugly, so precise measurements are vital. Write them down and double-check before moving to the next step. You can also compare them with sizing charts provided by traditional stores like TheLederhoseHerren for reference.
5. Drafting the Pattern
Creating the Lederhosen pattern is a critical stage. Start by sketching the front and back panels based on your measurements. Add design elements such as the drop-front flap (Hosenlatz), decorative embroidery space, and suspenders loops. You can find printable patterns online or even buy traditional-style paper patterns from sewing shops.
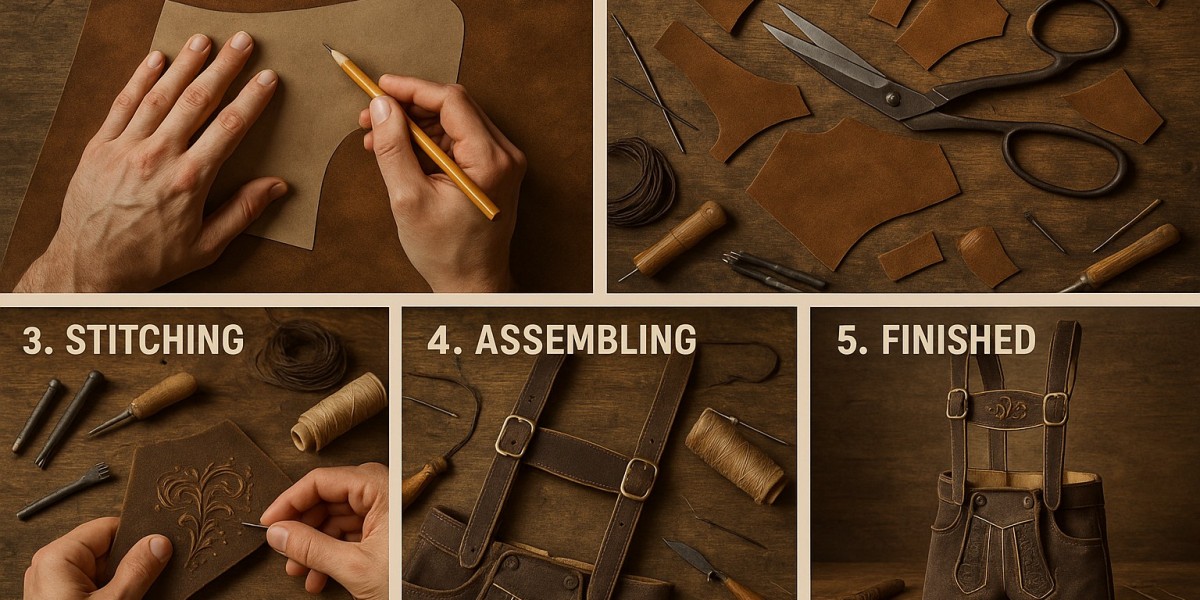
6. Cutting the Leather
Use tailor’s chalk to trace your pattern onto the leather, then cut carefully using a rotary cutter or heavy-duty scissors. Leather doesn’t stretch like fabric, so precise cutting is essential. Work on a flat, stable surface to avoid mistakes. Don’t forget to cut waistband, leg bands, and flap components.
7. Assembling the Front and Back Panels
Start sewing the front and back panels together. Use strong waxed thread and a leather needle. If using a machine, test stitch first to ensure proper tension. Begin with the inner leg seam, then move to the outer seams. Reinforce stress points like the crotch and pocket edges.
8. Attaching the Hosenlatz (Drop Flap)
The iconic Hosenlatz is what sets Lederhosen apart. Sew the flap onto the front using decorative buttons or metal clasps. You can also add embroidery around the flap for a personalized touch. This detail is often what draws attention, so spend time getting it right.
9. Adding Decorative Embroidery
Embroidery adds authentic flair to Lederhosen. Use heavy thread in traditional Alpine motifs such as edelweiss flowers or oak leaves. If hand-embroidering is too complex, consider iron-on patches or pre-made appliqués. The Alpen Kniebund Flula Lederhosen are a good inspiration for detailed embroidery styles.
10. Installing the Waistband and Leg Bands
Stitch the waistband, adding belt loops or suspender buttons as needed. Ensure a snug but comfortable fit. Leg bands at the bottom of the trousers help maintain the classic tapered shape. You can sew these flat or use elastic if more comfort is needed.
11. Inserting Pockets
Traditionally, Lederhosen comes with side and knife pockets. Measure and cut pocket linings, then stitch securely into the side seams before closing the panels. Leather pockets need reinforcement at the openings to avoid sagging over time.
12. Sewing the Suspenders
Suspenders are optional but iconic. Cut two long strips of leather and shape them to cross at the back. Add adjusters or decorative embroidery. Attach with buttons to the waistband. For ideas on stylish suspenders for women, check out this feminine Bavarian Lederhosen collection.
13. Finishing Touches and Conditioning
After all parts are sewn, treat your Lederhosen with leather conditioner to maintain flexibility and durability. This prevents cracking and enhances color. Let them rest overnight before wearing. You can polish or darken the leather with beeswax-based polish if you desire a vintage look.
14. Styling and Wearing Your Handmade Lederhosen
Pair your Lederhosen with a checked or white shirt, wool socks, and Haferl shoes. For festivals like Oktoberfest, accessorize with Alpine hats or vests. Your custom-made Lederhosen will not only stand out in the crowd but also serve as a talking point.
15. Caring for Your Lederhosen
Lederhosen are low-maintenance if properly cared for. Never machine-wash them. Instead, wipe off dirt with a damp cloth and condition occasionally. Store in a cool, dry place away from direct sunlight. For more care tips, always refer to expert advice or consult traditional stores.