If you’re managing contractors or freelancers, printing Form 1099 in QuickBooks is an essential step in your year-end tax preparation. This form helps businesses report payments made to non-employees to the IRS. In this guide, you’ll discover how to print Form 1099 in QuickBooks, how to troubleshoot common issues, and how to ensure your 1099 process is accurate and compliant.
Whether you’re using QuickBooks Online or Desktop, this article will help you print Form 1099 in QuickBooks without hassle.
What Is Form 1099 and Why It Matters?
Form 1099 is an IRS form used to report various types of income other than wages, salaries, and tips. If your business paid $600 or more to independent contractors or vendors, you must issue them a 1099 form.
QuickBooks simplifies this process by helping you prepare, review, and print 1099s directly from your account — saving time and reducing errors.
Step-by-Step Guide to Print Form 1099 in QuickBooks
Let’s explore how to print Form 1099 in QuickBooks for both online and desktop versions.
Step 1: Prepare Vendor Information
Before printing, make sure all vendor details are correct.
- Navigate to Expenses → Vendors.
- Select each vendor who needs a 1099.
- Verify their Tax ID Number (TIN) and Mailing Address.
- Ensure they are marked as “Track payments for 1099.”
This ensures your print Form 1099 in QuickBooks process runs smoothly.
Step 2: Verify 1099 Transactions
Check that all payments qualify for 1099 reporting.
- Go to Reports → Vendors & Payables → 1099 Transaction Detail Report.
- Review and categorize payments correctly under Non-employee Compensation or other applicable boxes.
Step 3: Map Your 1099 Accounts
Mapping connects your expense accounts to the right 1099 boxes.
- In QuickBooks, go to Edit → Preferences → Tax: 1099 → Company Preferences.
- Choose the accounts used to pay contractors.
- Map them to the correct 1099 boxes.
This setup is crucial before you print Form 1099 in QuickBooks Desktop download.
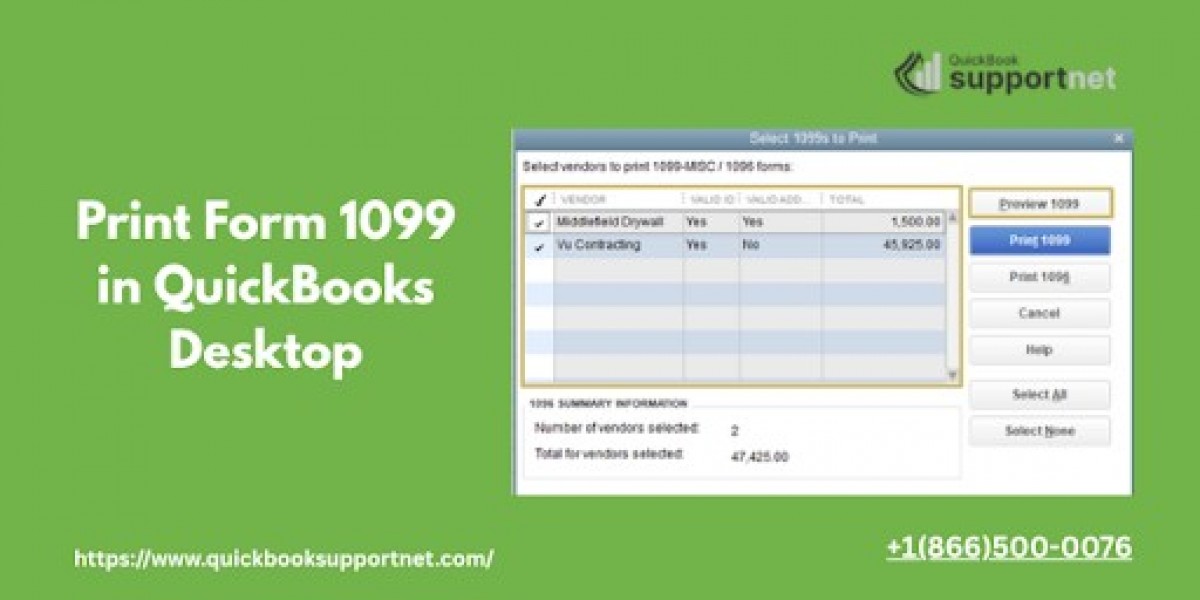
Step 4: Print 1099s in QuickBooks Desktop
To print Form 1099 in QuickBooks on your desktop, follow these steps:
- Go to Vendors → Print/E-file 1099s → 1099 Wizard.
- Select the vendors and review their data.
- Choose Print 1099s.
- Load your pre-printed 1099 forms into the printer.
- Print and verify alignment using the sample print feature.
You can also download your 1099 forms and print them later from QuickBooks Desktop download.
Step 5: Printing 1099s in QuickBooks Online
If you’re using QuickBooks Online:
- Navigate to Expenses → Vendors.
- Select Prepare 1099s.
- Verify vendor and payment details.
- Click Print and Mail.
Your forms are now ready to be distributed to vendors and sent to the IRS.
Common Issues When Printing Form 1099 in QuickBooks
Sometimes users encounter issues while printing. Here’s how to troubleshoot them:
1. Alignment Problems
If the print alignment is off, use QuickBooks’ Print Sample feature to test alignment before printing the final copy.
2. Missing Vendors
If a contractor doesn’t appear in the 1099 list:
- Confirm they’re set up for 1099 tracking.
- Check if their payments qualify under the IRS threshold.
3. Incorrect Data
If your printed forms show wrong totals:
- Verify that your expense accounts are mapped correctly.
- Re-run the 1099 Summary Report.
4. Printing Errors
If QuickBooks won’t print the form:
- Restart your printer and QuickBooks.
- Try re-downloading the QuickBooks 1099 form files.
- Check for printer driver updates.
Tips to Ensure Smooth 1099 Printing
- Always update QuickBooks before printing forms.
- Use official IRS-approved 1099 paper for best results.
- Save a digital backup of each form for future reference.
- Double-check vendor data before submission.
Following these best practices ensures that your print Form 1099 in QuickBooks process is efficient and error-free.
QuickBooks Desktop vs. Online – Which Is Better for 1099 Printing?
| Feature | QuickBooks Desktop | QuickBooks Online |
|---|---|---|
| Printing Flexibility | High (custom alignment) | Moderate |
| Data Mapping | Manual but detailed | Automatic |
| E-filing Option | Available | Built-in |
| Ease of Use | Requires setup | Beginner-friendly |
If you frequently print multiple 1099s, QuickBooks Desktop offers better control, especially when using the print Form 1099 in QuickBooks Desktop download option.
Final Thoughts
Printing Form 1099 in QuickBooks doesn’t have to be complicated. Whether you’re using QuickBooks Desktop or Online, this guide ensures you understand every step — from setup to troubleshooting.
If you still face challenges with your print Form 1099 in QuickBooks process, you can reach expert support at +1(866)500-0076 for immediate assistance.
FAQs About Printing 1099s in QuickBooks
Q1. Can I print 1099s on plain paper in QuickBooks?
No, the IRS requires you to use pre-printed 1099 forms unless you e-file directly through QuickBooks.
Q2. How do I reprint Form 1099 in QuickBooks Desktop?
Go to Vendors → Print/E-file 1099s → 1099 Wizard, and select Reprint 1099s.
Q3. Is it possible to print 1099s from QuickBooks Online?
Yes, QuickBooks Online allows you to print Form 1099 in QuickBooks Online directly after reviewing and preparing forms.
Q4. What should I do if my 1099 alignment is off?
Use the Print Sample feature to adjust the form’s position before printing final copies.
Q5. Do I need to e-file if I print 1099s manually?
If you print and mail your 1099s to the IRS, e-filing is optional, but QuickBooks also offers an e-file service for convenience.
Read This Blog:- https://www.germanwomenorg.com/read-blog/3890